Car Cleaning tips
"The ultimate shampoo and set!"
 For best result print these off and present a copy to your partner to follow. For our take on the best cleaning products click here.
Even the hottest car on the street looks rough when it is dirty. Here are some top cleaning tips from www.torquecars.com members gathered from hundreds of Bucket & Sponge sessions and with tips from showrooms and car exhibitors.
The following tips contain a quick (going out with parents) and showroom (car needs to look perfect) guide to cleaning your car.
The key here whilst cleaning is to avoid adding scratches to the paintwork, make sure that anything that touches the paintwork is free of grit and is rinsed thoroughly each time it is reapplied to the bodywork. This is also the reason you start at the top of the car and work down to the grittiest parts last. Most light swirls and scratches in a cars paintwork are caused by careless cleaning, typically where a cleaning cloth is used near the wheels and it picks up grit and then it is wiped over the paintwork.
Step 1: Rinse & wet the car (with standard tap water)- DO NOT USE A SPONGE because it will pick up grit and you'll be rubbing the grit around and it'll act like sandpaper. A high pressure hose is best for this but a hose pipe with a strong jet will help. Once you have removed the loose grit and the car is wet the rest of the dirt will start to loosen as the water gets into it. (To allow time for the water to start dissolving the dirt it's a good time to clean out the inside of the car.)
Step 2: inside of the car: Pick up crisp packets, sweet wrappers and those car park stickers. Remove removable mats and vacuum them then move on to the rest of the interior with the Hoover. Wipe down the dashboard, console and all other plastic with a damp (not wet) cloth. (for soiled areas use a mild detergent but wipe off thoroughly). Avoid using products with Silicone in as they leave a greasy residue & over spray onto the pedals can be lethal. Do not polish the dashboard because this can cause glare on sunny days. Carpet & upholstery stains can be easily removed with CAR PLAN interior valet (this is the only product I have found that could remove dark engine grease stains on a light grey interior.) Finally wipe over the sills, boot (USA Trunk) seams (the internal bits you only see when the door is open with a damp sponge.) - Read our dashboard cleaning article for more tips on this.
Step 3: Back to the outside - the car should still be wet - hose over one more time ready for the pre wash. Use a clean soft fluffy wool mitt, and very gently wipe over the entire car the aim is to remove all grit particles. (Do not scrub tar or mud deposits at this stage) Start at the top of the car and work round it in circles like peeling an orange making the sills and bumpers the last thing you touch overall - these are generally the dirtiest and most gritty items.
Step 4: Pre wash. Using a bucket of clean (for perfection use filtered) water and a car pre wash product - choose something that does not foam up or cause lots of bubbles. (Autoglym car shampoo is very good and conditions the water to avoid streaks.) Don't use a shampoo with built in polish this would effectively seal the dirt and stains under a thin layer of wax and makes the cleaning job 100 times harder and makes the windows go hazy every time you use your wipers. Use a tar and bug remover spray to soften the really stubborn stains.
Step 5: Main Wash. Again with a quality car shampoo. Time to use a slightly harder sponge or cotton cleaning pad. Like last time work in circles using the orange peel method. A scrub pad can be used for really tough stains but only on areas of paint work hardened like the sills and lower front bumper. You want to avoid creating those wheel mark scratches caused mainly by bad cleaning methods or automatic car washes.
Step 6: Wheels and tyres - clean off with a brush first, then use a hard sponge or scrub pad. (If your wheels have a special chrome or paint finish then the same rules apply as for paintwork and you should use a lambswool wash mitt). Do not use anything you'll use to clean the wheels on your bodywork next time or it will be full of grit and scratch your paint work. Brake dust is hard to remove and you'll usually require a chemical brake dust and alloy wheel cleaner. These usually need brushing on leaving for a while then sponging off. As fairly nasty chemicals are used in most of these products wear gloves and avoid contact with your skin. (Read more in our alloy wheel cleaning article.)
Step 7: Rinse off. Time for some fresh clean water. A watering can filled with water (again for perfection filtered) is the easiest method of rinsing off the car.
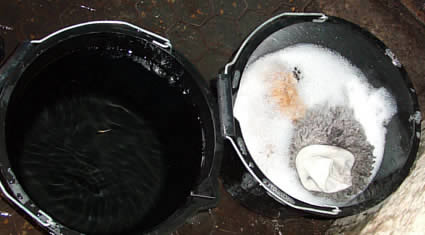 TIP: Work on one panel at a time starting with the roof, next for UK people do the bonnet (but if your in the USA do the hood)! Also use two buckets - one with clean water for rinsing to avoid grit contamination.
Step 8: Dry the car off using a Chamois leather. They need to be slightly damp to work best and you are buffing the water into small droplets, a mist then a haze then the water is gone. Most people expect the Chamois to work like a towel and soak up the water but it works more like a wiper blade - creating a thin film of water and letting it evaporate itself. Patience is the key.
Step 9: Glass - using a glass cleaning product go over the windows inside and out in a circular motion. Very good results can be obtained using a slightly damp micro fiber cloth. DON'T USE HOUSE GLASS CLEANER - make sure its a proper automotive glass cleaner. This is also the time to fix the stone chips (You'll have to wait for the paint to dry before moving on to the polishing stage.) We are doing an article on stone chip removal so check back soon!
Tip: The best cloth to use on glass is a piece of Hessian which has been hot washed to remove the colour and shrunk. (Window cleaners swear by it.) It's handy to keep in the car for cold morning when the windows mist up. We also recommend the use of micro fibre cloths for paint work, chrome and other areas this leaves a streak free finish.
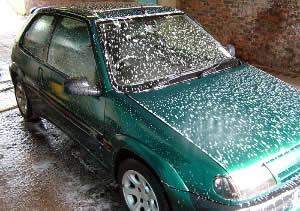
Step 10: The polish. Generally you rub it on (in straight lines not circles) to a light haze then buff off. An electronic buffer can really cut the polishing time but be careful. IE: If you used an electric buffer to clean your face it would be quick but hurt. Car paint work is also delicate and pressure should not be applied and only soft cloths should be used. Use one cloth to apply the polish, another to buff it off and then with a really soft cloth buff up the polish to a showroom finish. Two mist & buff off coats are far better than gobbing on as much polish as you can (the extra is just rubbed off and less shiny residue is left behind.)
The quick method. Jet wash the car down and rub it over. Add your polish to a litre of water and rub it into the paint work only - don't do the windows. Jet wash to rinse off. Then with a fine sponge rub the car all over with clean water. Squirt your windscreen washer and set your wipers to fast. Go for a drive to dry the car off. Buff off the damp polish residue with a chamois leather and &shiny within 15 minutes.
So what are the BEST products & what do we recommend?
Autoglym - This is a very extensive range of car cleaning products and in our opinion is very good value for money. The car shampoo by Autoglym works very well and we strongly suggest you also investigate the wonders of "Snow foam". The Autoglym range is available from most good car part shops - see our shop link page for details. Meguiars Tech wax gives a superb finish on slightly scratched paint without resorting to the use of abrasives and is really easy to apply.
Interior Cleaner - Car plan interior valet spray - in our test was the best budget buy mass market product available and did just seem to dissolve the dirt. We recommend using a stiff brush because the included plastic brush is a little to harsh. This is available from your local car store. For the perfectionists - use a clay bar and also try the Bilt-Hamber or Meguiars range to give your car a spa day & beauty makeover.
Many of the tips on these pages were gleaned from members in our very friendly forum. Please join our forum to benefit from the latest tips and suggestions on car cleaning, car care and all other aspects of car ownership.
Please Check out my YouTube channel, we're regularly adding new content...
 Click to accept YouTube Cookies & Play.
Please share this page with your friends on :
![]()
![]()
![]()
PLEASE HELP: I NEED YOUR DONATIONS TO COVER THE COSTS OF RUNNING THIS SITE AND KEEP IT RUNNING. I do not charge you to access this website and it saves most TorqueCars readers $100's each year - but we are NON PROFIT and not even covering our costs. To keep us running PLEASE Donate here
If you liked this page please share it with your friends, drop a link to it in your favourite forum or use the bookmarking options to save it to your social media profile.
Feedback - What do You Think?
Please use our forums if you wish to ask a tuning question, and please note we do not sell parts or services, we are just an online magazine.
Help us improve, leave a suggestion or tip
Please watch this video and subscribe to my YouTube channel.