Guide to respraying your car
"Slap on the colour"
 Respraying your car - some common sense tips, a step by step guide and hints from TorqueCars.
A fantastic way of changing the appearance of your car is to respray it.
The scratches, scrapes and paint degradation quickly build up and the only way to restore a car's appearance is to do a bare metal respray.
Please note that you will not usually get a perfect professional finish from a spray can.
The proper equipment would require a filtered booth to avoid releasing carcinogens and other nasties into the atmosphere and a high quality spray gun with various nozzle sizes depending on the paint and finish required.
(Although one of our members has proved that you can do a good job on a DIY basis as long as you take your time and prepare well.)
Please adhere to your local regulations relating to the release of paint compounds into the atmosphere. In most countries you will need to hire/use a filtered booth and use the correct protective clothing.
Preparation is 65% of the job, painting is 25% and flatting/polishing is 10%. Ensure that the area you paint in is completely dust free. It also helps if you are respraying your car on a warm day or have access to a low bake oven.
If you are after a flip paint or special effect you must ensure that you buy the right paint! One of our members provided a paint guide when he re-sprayed his Megane at home with matt silk paint.
Paints all behave in very different ways and come in the following main types base or acrylic, and then there are all sorts of effects and finishes to choose from such as metallic, pearlescent, translucent and chrome. The techniques for application of these paints are not the same. We are assuming a standard base paint for this guide.
Safety. Paint fumes are not healthy to breathe in. A decorators dust mask will not protect you. You need good filtration to take out paint particles and you need to ensure that the area you are painting in has a good supply of fresh air and is well ventilated.
Equipment. Spray paint cans will never give a professional finish and are actually extremely expensive when compared with the cost of hiring a good quality spray gun and the paint. Check how much area the tin of paint covers to see what I mean and remember that you want to be doing 5-9 thin mist coats of paint. This could take 16-20 tins of spray paint easily.
Step 1: Preparation. Wash down the area to be painted thoroughly. Ensure that all sanding and filling has been done before you get to this stage.
The slightest bump or uneven surface will really stand out when the car is sprayed. So take time and view the panel from different angles to ensure that there are no flaws that remain.
Wet the surface and inspect with a lamp and this will show any imperfections that you may have missed. You can also test for imperfections by rubbing your hand over the area, it needs to be glass smooth for a decent finish (you'll then need to key the surface with a fine grit wet and dry paper if there is a shine).
If you have not stripped off the old paint with a good paint remover and sanded the metal and prepared it with a rust inhibitor you need to ensure that all grit, dust and road film is removed by using a good quality car cleaning fluid WITHOUT a wax additive and that the paint surface is lightly sanded to allow good adhesion from the new paint. Washing up liquid does a good job as this strips most of the wax, oil and bug residue from the car.
Step 2: Clinical cleansing. Using a paper towel or preferably a screen wipe and solvent cleaner such as IPA or similar spirit wipe over and buff off the surface to a smear free finish. Any oils will cause poor paint adhesion and will lead to bubbles and flakes.
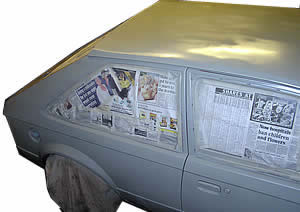
Step 3: Masking. Any exposed area of the car is going to get painted - if you are just a few mm out with the masking you will have really annoying over-spray lines.
Masking is even more important if you are changing the colour of the car, and you should pay attention to all of the seams i.e. open the doors, bonnet etc. and take out the glass (when the windscreen goes and is replaced you do not want a small patch of the old paint showing through.)
In a perfect world the car will just be a shell with all plastic and interior removed. The more plastic you can remove from the car the better and if you can remove the glass as well you will make the job easier and not have to touch up the edges when glass is replaced later as the seals rarely sit exactly where they were.
Step 4: Spraying. Ensure that you have a good flow of paint so test on a scrap of card - you need to look out for blobs and splatters. Do not aim to completely cover the metal just spray a fine mist over the surface - a load of thin coats of paint is much better than a couple of thick coats.
Keep the spray gun moving at a regular pace from left to right on the first coat then up and down on the next coat. Try to view the car as a whole rather than just painting a panel at a time (if you are respraying just one panel you need to blend the paint in to the surrounding panels as most if not all paints fade over time.)
Ideally leave at least 1 hour between coats of paint. For many paints you need to finish with a final lacquer coat. The final lacquer coat will be the last you apply and even this can be applied in a couple of thin layers.
Step 5: Leave the lacquer to 'go off' before waxing ideally for 2-3 days. Finish off with a fine grit of wet and dry paper then polish off with a cutting paste and then apply a good quality wax - this protects the car when you are refitting the parts you stripped off it. If you want a matt (non reflective finish) ignore step 5.
Please Check out my YouTube channel, we're regularly adding new content...
 Click to accept YouTube Cookies & Play.
Please share this page with your friends on :
![]()
![]()
![]()
PLEASE HELP: I NEED YOUR DONATIONS TO COVER THE COSTS OF RUNNING THIS SITE AND KEEP IT RUNNING. I do not charge you to access this website and it saves most TorqueCars readers $100's each year - but we are NON PROFIT and not even covering our costs. To keep us running PLEASE Donate here
If you liked this page please share it with your friends, drop a link to it in your favourite forum or use the bookmarking options to save it to your social media profile.
Feedback - What do You Think?
Please use our forums if you wish to ask a tuning question, and please note we do not sell parts or services, we are just an online magazine.
Help us improve, leave a suggestion or tip
Please watch this video and subscribe to my YouTube channel.